Sunday, September 20, 2020

Customizing default filename when saving SSRS report (Ax 2012)

 In this example, I show you how we can change the default file name proposal in the “Save As” dialog of a SSRS report in Ax 2012.

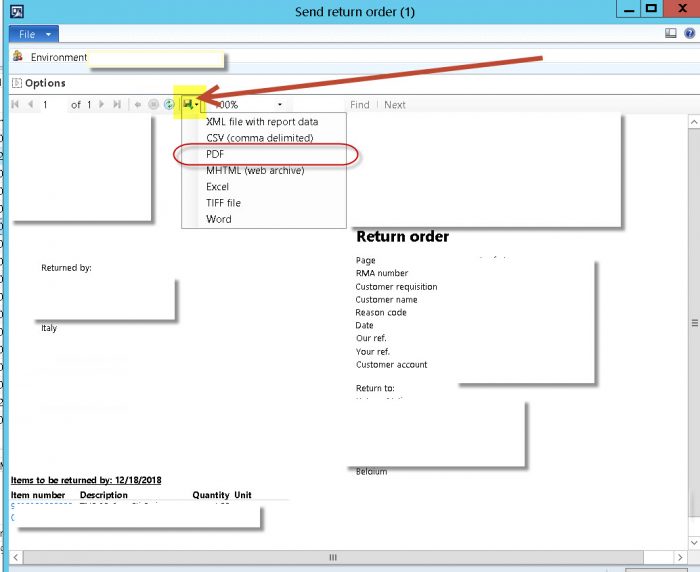
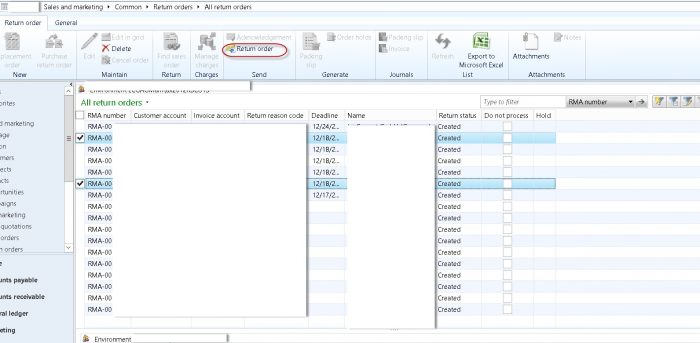
By default Dynamics Ax comes with a default file name proposal when we save a SSRS report, but this default name is not always usable, in case if we can print the report for each record in a grid with multi select options. In that case Dynamics Ax will propose the same report name for each selected record of the grid. In this example we made a change in the “Send Return Report” (path : Sales and Marketing | Common ” return orders | all return orders -> button ‘Return order’ .

When we have generated the report, we can save the report in divers formats like csv or pdf under the ‘diskette’ icon in the header bar of the report screen.

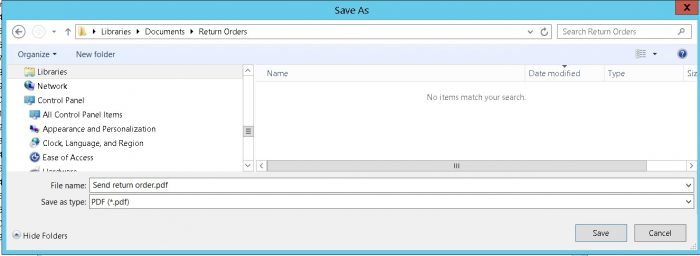
If we select for example PDF format, we see the default name suggestion, in this example the report name:

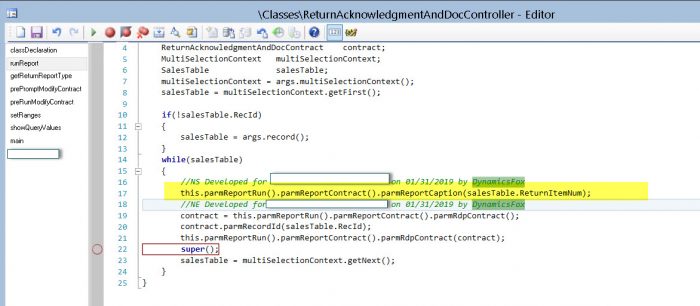
We would like to change this. Instead we would like to use the RMA number as RMA number is unique for each report, so that in case of multi select we can distinguish each saved report file . In order to perform this we have to make the following change in the parmReportCaption method of the the reports controller class of the report, which is the ReturnAcknowledgementAndDocController class. In the screenshot below you can see (yellow marked line no 17) the changes we need to made:

Then we have to run the incremental CIL:

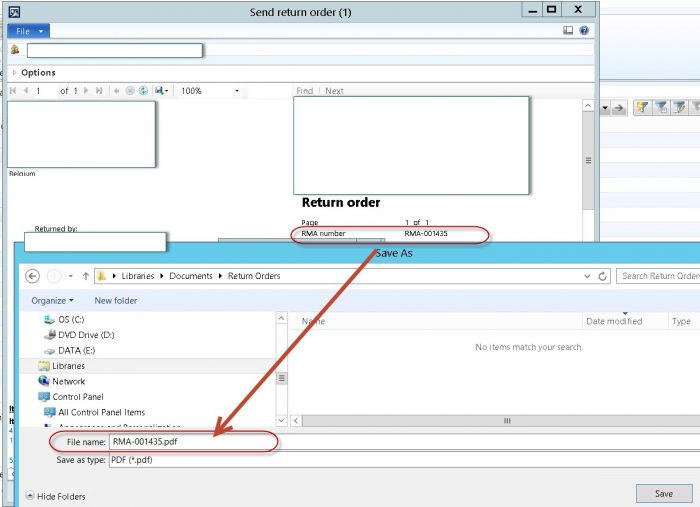
When re-open the report and would like to save it we can see the suggested file name is the same as the reports RMA number:

Create default dimension using x++

 //Change the arguments (variable) names and assign names as per your requirements

//Change in the function as well
public DimensionDefault createDefaultDimension(str department, str purpose, str costCenter)
{
    DimensionAttributeValueSetStorage   valueSetStorage = new DimensionAttributeValueSetStorage();
    DimensionDefault                    result;
    int                     i;
    DimensionAttribute      dimensionAttribute;
    DimensionAttributeValue dimensionAttributeValue;
    
    //Change the dimension names. Use the dimension name which are open and active in the system
    //I have given Region, Purpose and Costcentre just for an example
    
    container               conAttr = ["Region", "Purpose", "Costcentre"];
    
    //Change the values which you want to set in dimensions. Use values which are open and active in the system
    //I have given the arguments of function as values for dimensions.
    
    //Dimension name    ->      dimension value
    
    //Region            ->      department
    //Purpose           ->      purpose
    //Costcentre        ->      costCenter
    
    container               conValue = [department, purpose, costCenter];
    
    str                     dimValue;
    
    for (i = 1; i <= conLen(conAttr); i++)
    {
        dimensionAttribute = dimensionAttribute::findByName(conPeek(conAttr,i));
        if (dimensionAttribute.RecId == 0)
        {
            continue;
        }
        dimValue = conPeek(conValue,i);
        if (dimValue != "")
        {
            dimensionAttributeValue = dimensionAttributeValue::findByDimensionAttributeAndValue(dimensionAttribute,dimValue,false,true);
            valueSetStorage.addItem(dimensionAttributeValue);
        }
    }
    
    result = valueSetStorage.save();
    //It reutrns the value of type DimensionDefault
    return result;
}

How to Show GST % PO report

 purchTable = purchTable::find('02-000164');

taxDocument = TaxBusinessService::getTaxDocumentBySource(purchTable.TableId, purchTable.RecId);
 
 if(taxDocument)
  {
        componentLineEnumerator = taxDocument.componentLines();

        while(componentLineEnumerator.moveNext())
        {
            componentLineObject = componentLineEnumerator.current();

            taxComponent= componentLineObject.metaData().taxComponent();
            taxValue = componentLineObject.getMeasure("Rate").value().value() * 100;
            taxAmount = componentLineObject.getMeasure("Tax Amount").value().value();      

            info(strFmt("Component %1 ,Rate %2, Amount%3",taxComponent,taxValue,taxAmount));
        }
    }

Friday, September 4, 2020

SEND EMAIL IN D365 CODE X++ LOGIC


public static void SendEmail()
{
System.IO.Stream workbookStream = new System.IO.MemoryStream();
SysMailerSMTP   mailer = new SysMailerSMTP();
SysMailerMessageBuilder builder = new SysMailerMessageBuilder();
SysEmailParameters parameters = SysEmailParameters::find();
;
 //you will have to setup the below parameters in sysadmin module
if (parameters.SMTPRelayServerName)
{
mailer.SMTPRelayServer(parameters.SMTPRelayServerName,
parameters.SMTPPortNumber,
parameters.SMTPUserName,
SysEmailParameters::password(),
parameters.SMTPUseNTLM);
}
else
{
warning(“SERVER NOT FOUND”);
}


builder.setFrom(SysEmailParameters::find().SMTPUserName);
builder.addTo(“To address”);
builder.addCc(“CC address”);
builder.addAttachmentFromFile(“Fetch the file from the path”);
builder.setSubject(“Email subjectl”);
SysMailerFactory::getNonInteractiveMailer().sendNonInteractive(builder.getMessage());

}

TABLE BROWSER IN D365


BROWSING A TABLE IN VISUAL STUDIO IS A BIT TEDIOUS AND SLOW TASK.
HOWEVER IN D365 WE HAVE A VERY GOOD OPTION TO CHECK ANY TABLE IN THE BROWSER ITSELF.
YOU WILL JUST NEED TO USE THE BELOW URL .
https://envt.cloudax.dynamics.com/?mi=SysTableBrowser&prt=initial&cmp=eat1&tablename=CUSTTABLE&limitednav=true 

cmp -> company
tablename - > the name of the table
limitednav - > restricts the navigation bar to show only the table and hide other parts.
prt - > it is deprecated


You will see the below screen on using the URL.
TABLE BROWSER IN D365, D365 F&O TABLE BROWSER, BROWSER IN D365, BROWSER D365 FNO, SYSTABLEBROWSER, CHROME EXTENSION FOR TABLE BROWSER D365, D365 ENVIRONMENT,


In case you want a more advanced tool to check the data then you should add the below extension for chrome users.
I think it is not available for IE.

Click on the below link to install the chrome extension.

 Once installed the chrome will have the addon as shown below.
Fist click on the configure tab and input the details of the environment .
Now you can add and see as many tables as you want and it can be filtered as per the company.

EVENT HANDLERS IN D365

 1)

/// <summary>
///
/// </summary>
/// <param name="sender"></param>
/// <param name="e"></param>
[FormEventHandler(formStr(HcmPosition), FormEventType::Initialized)]
public static void HcmPosition_OnInitialized(xFormRun sender, FormEventArgs e)
{     
FormDataSource hcmposition_ds = sender.dataSource(formDataSourceStr(HcmPosition, HcmPosition));

 //you can also directly specify the datasource name - > //sender.dataSource('HcmPosition');
 }


[FormEventHandler(formStr(HcmPositionMassUpdate), FormEventType::Initialized)]
 public static void HcmPositionMassUpdate_OnInitialized(xFormRun _sender, FormEventArgs _e)
    {
        // Initialize the instance of this form extension handler now that the controls exist
        FormRun positionMassUpdateForm = _sender as FormRun;
        HcmPositionMassUpdateFormEventHandler extensionInstance = positionMassUpdateForm.getExtensionInstance(classStr(HcmPositionMassUpdateFormEventHandler));
        extensionInstance.init();
    }


2) how to get the current selected record in the event handler when clicked on some button.
Below code will give you the selected record in the hcmposition variable.
You can get the form run also.
[FormControlEventHandler(formControlStr(HcmPosition, HcmPositionNewPosition), FormControlEventType::Clicked)]
        public static void HcmPositionNewPosition_OnClicked(FormControl sender, FormControlEventArgs e)
        {

            HcmPosition hcmposition = sender.formRun().dataSource(1).cursor();//hcmposition is the //primary datasource.

        FormButtonControl callerButton = sender as FormButtonControl;  //Retrieves the button
        FormRun form = sender.formRun(); //Gets the formRun

In case you want to select any other datasource you can do the following

        FormDataSource hcmWorker_ds = form.dataSource(formDataSourceStr(HcmWorker, HcmWorker)) as FormDataSource;

        FormDataSource HcmPositionDetail_ds= form.dataSource(formDataSourceStr(HcmWorker, HcmPositionDetail)) as FormDataSource;

        HcmWorker hcmWorker = hcmWorker_ds.cursor();

        //Set up args with all of the information you've retrieved     
    }

3) In order to get the formrun use the below
 FormRun formRun = sender.formRun() as FormRun;

4) In order to validate a std field you will have to use the below code.
    /// <summary>
    /// Event handler for the validated event on the BudgetPurposeType field on the HcmTmpBudgetPurposeType data source on the HcmPositionMassUpdate form.
    /// </summary>
    /// <param name="_sender">The form control raising the event.</param>
    /// <param name="_e">Args for the event.</param>
    [FormDataFieldEventHandler(formDataFieldStr(HcmPositionMassUpdate, HcmTmpBudgetPurposeType, BudgetPurposeType), FormDataFieldEventType::Validated)]
    public static void BudgetPurposeType_OnValidated(FormDataObject _sender, FormDataFieldEventArgs _e)
    {
        HcmTmpBudgetPurposeType tmpBudgetPurposeTypeLocal;
        HcmTmpBudgetPurposeType hcmTmpBudgetPurposeType = _sender.datasource().cursor();

        // Validate for duplicates.
        tmpBudgetPurposeTypeLocal.setTmpData(hcmTmpBudgetPurposeType);

        select firstonly RecId from tmpBudgetPurposeTypeLocal


     where tmpBudgetPurposeTypeLocal.BudgetPurposeType == hcmTmpBudgetPurposeType.BudgetPurposeType
                    && tmpBudgetPurposeTypeLocal.LegalEntity == hcmTmpBudgetPurposeType.LegalEntity;

        if (tmpBudgetPurposeTypeLocal.RecId)
        {
            throw error("@Workforce:TheBudgetPurposeTypeIsAlreadyInUse");
        }
    }


3) Similarly if you want to write code on form modified or active on initialize you can use the below code
Sales Table Form --> Events --> OnActivated

 ////</summary>
     ////<param name="sender"></param>
     ////<param name="e"></param>
    [FormDataSourceEventHandler(formDataSourceStr(SalesTable, SalesTable), FormDataSourceEventType::Activated)]
    public static void SalesTable_OnActivated(FormDataSource sender, FormDataSourceEventArgs e)
    {
        boolean     allowEdit = true;

   
        SalesTable           SalesTable     = sender.cursor();
        FormDataSource      salesTable_ds  = sender.formRun().dataSource("SalesTable");

 FormRun             element       = sender.formRun();
        FormControl         ShippingDateRequested   = element.design(0).controlName("Delivery_ShippingDateRequested");
     
        if (ShippingDateRequested    == datenull())
{
ShippingDateRequested.enabled(false);
}
else
{
ShippingDateRequested.enabled(true);
}
    }

similarly you can write pre and post event handlers as below for different tables.
 [PostHandlerFor(tableStr(InventTrans), tableMethodStr(InventTrans, AmountMst))]
    public static void InventTrans_Post_anyValidateMethod(XppPrePostArgs args)
    {
        boolean ret = args.getReturnValue();
        InventTrans  InventTrans = args.getThis() as InventTrans;
        if (InventJournalName::find(InventTrans.Qty > 0 && InventTrans.CostPrice == 0)
        {
            ret = checkFailed(strFmt("Cost Price is 0 for Line %1",InventTrans.LineNum));
        }
        args.setReturnValue(ret);
    }

Below code executes after the standardd init method of the formMethodStr(HcmPositionMassUpdate, init)
if you wan to do somthing befoore the code execution write a pre event handler
  /// <summary>
    /// Post-event handler for the init method of the HcmPositionMassUpdate form.
    /// </summary>
    /// <param name="_args">Args for the event.</param>
    [PostHandlerFor(formStr(HcmPositionMassUpdate), formMethodStr(HcmPositionMassUpdate, init))]
    public static void HcmPositionMassUpdate_Post_init(XppPrePostArgs _args)
    {
        FormRun positionMassUpdateForm = _args.getThis();

        HcmPositionMassUpdateBase positionMassUpdateBase = positionMassUpdateForm.parmPositionMassUpdateBase();
        Args args = positionMassUpdateBase.parmFormArgs();

        if (args.record() && args.record().TableId == tableNum(HcmPositionForecastScenario))
        {
            HcmPositionMassUpdateFormEventHandler::disableFinancialDimensionTab(args, positionMassUpdateForm);
        }
    }


 [DataEventHandler(tableStr(HcmPositionWorkerAssignment), DataEventType::Deleted)]
    public static void HcmPositionWorkerAssignment_onDeleted(Common _sender, DataEventArgs _e)
    {
        HcmWorkerHelper::getDepartmentRecIdsCacheClear();
    }


    [DataEventHandler(tableStr(HcmPositionWorkerAssignment), DataEventType::Inserted)]
    public static void HcmPositionWorkerAssignment_onInserted(Common _sender, DataEventArgs _e)
    {
        HcmPositionWorkerAssignment positionWorkerAssignment = _sender as HcmPositionWorkerAssignment;

        PayrollWorkerTaxRegion::refreshTaxRegionsForWorkerAtPosition(positionWorkerAssignment.Worker, positionWorkerAssignment.Position);
    }

In case there are some changes which needs to be done in a standard method in between the code.
    /// <summary>
     /// </summary>
    public void initForm()
    {
        next initForm();
        //do something here.
    }
QR Code DAX 2012


static void JobCreateforQRCode(Args _args)
{
Image image;
container imageContainer;
str url;
EFDocQRCode_BR qrCode;

// The url to create the QR code.
url = 'http://www.google.com';

// Create an instance of the QR code class
qrCode = new EFDocQRCode_BR();

// Generate a QR code for the URL and save the result to a container
imageContainer = qrCode.generateQRCode(url);

// Use AX's good old Image class to load the image from the container
// and save it as a file
image = new Image();
image.setData(imageContainer);

image.saveImage("F:\QrCode.jpg", ImageSaveType::JPG);
}

Change Color of your Dynamics AX Environments/Forms

 To change the color of the Dynamics forms to help indicate what environment is in use. It involved overriding the SysSetupFormRun.run() method, which will be called every time a form is opened. On the class SysSetupFormRun, create a new method with this code:


public void run()
{
SysSQLSystemInfo systemInfo = SysSQLSystemInfo::construct();
; 

super();


// Set the color scheme of this instance of the SysFormRun to RGB
this.design().colorScheme(FormColorScheme::RGB);


// If the database name is not the live version, change the color of the form

if (systemInfo.getloginDatabase() != 'DynamicsAX_test')
this.design().backgroundColor(0x112255);
}


 If your live and test systems use the same database name, but the AOS is running on different servers you can modify this code to to match on systemInfo.getLoginServer() != 'MyServerName'. You can change the color by setting the hex value. It uses the RGB values in reverse order: 0xBBGGRR. 

HOW TO GET GRID RECORDS IN DYNAMICS AX

 If you want to get the records of all the selected records in the grid on a form then write the below code in the clicked method of the form,

we can loop it for multiple records and can do any task required.

for (custInvoiceJourLoc = getFirstSelection(custInvoiceJour_ds);
custInvoiceJourLoc;
custInvoiceJourLoc = custInvoiceJour_ds.getNext())
{
// do some tasks here.

}

HOW TO GET DIMENSION FROM A RECORD

static void getCustomerDimension(Args _args)
{
    CustTable                         custTable = CustTable::find("Cust001");
    DimensionAttributeValueSetStorage dimStorage;
    Counter i;
      
    dimStorage = DimensionAttributeValueSetStorage::find(custTable.DefaultDimension);
  
    for (i=1 ; i<= dimStorage.elements() ; i++)
    {
        info(strFmt("%1 = %2", DimensionAttribute::find(dimStorage.getAttributeByIndex(i)).Name,        
                               dimStorage.getDisplayValueByIndex(i))); 
    }